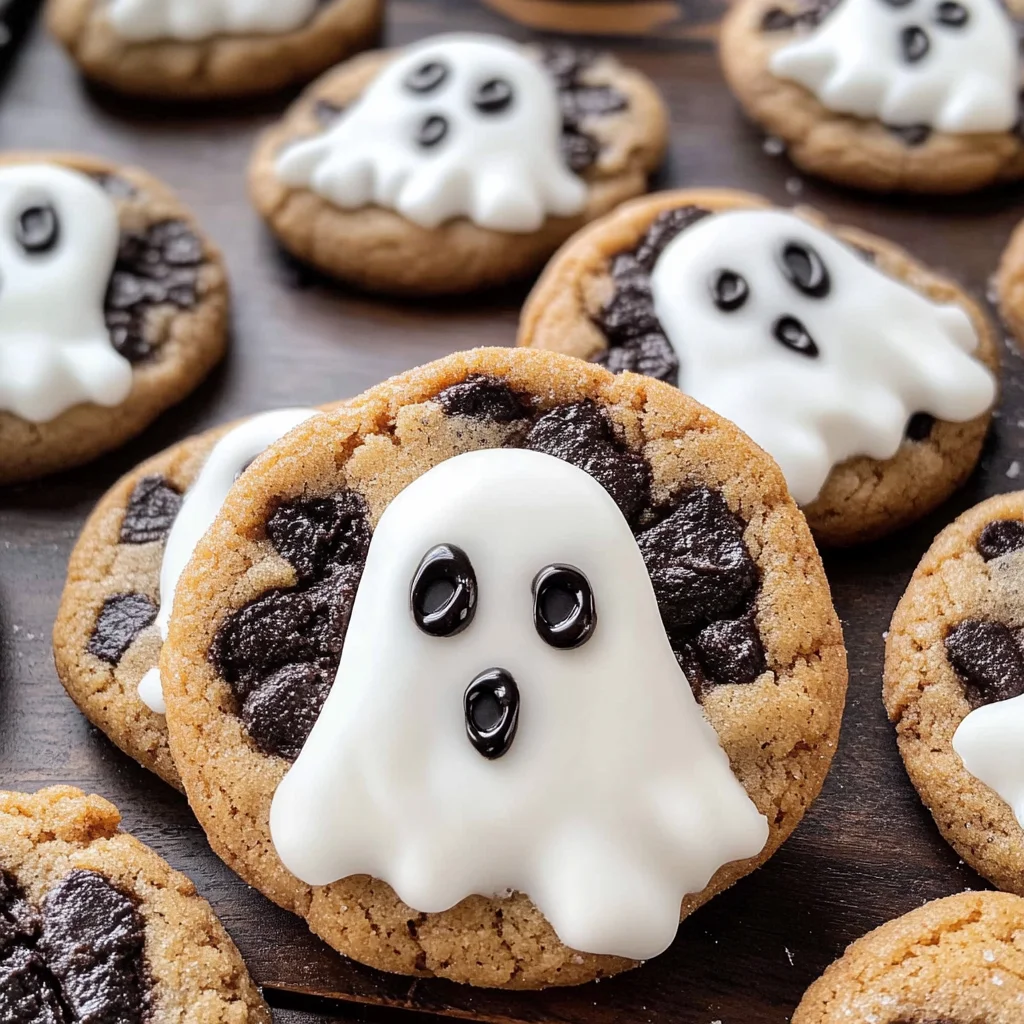
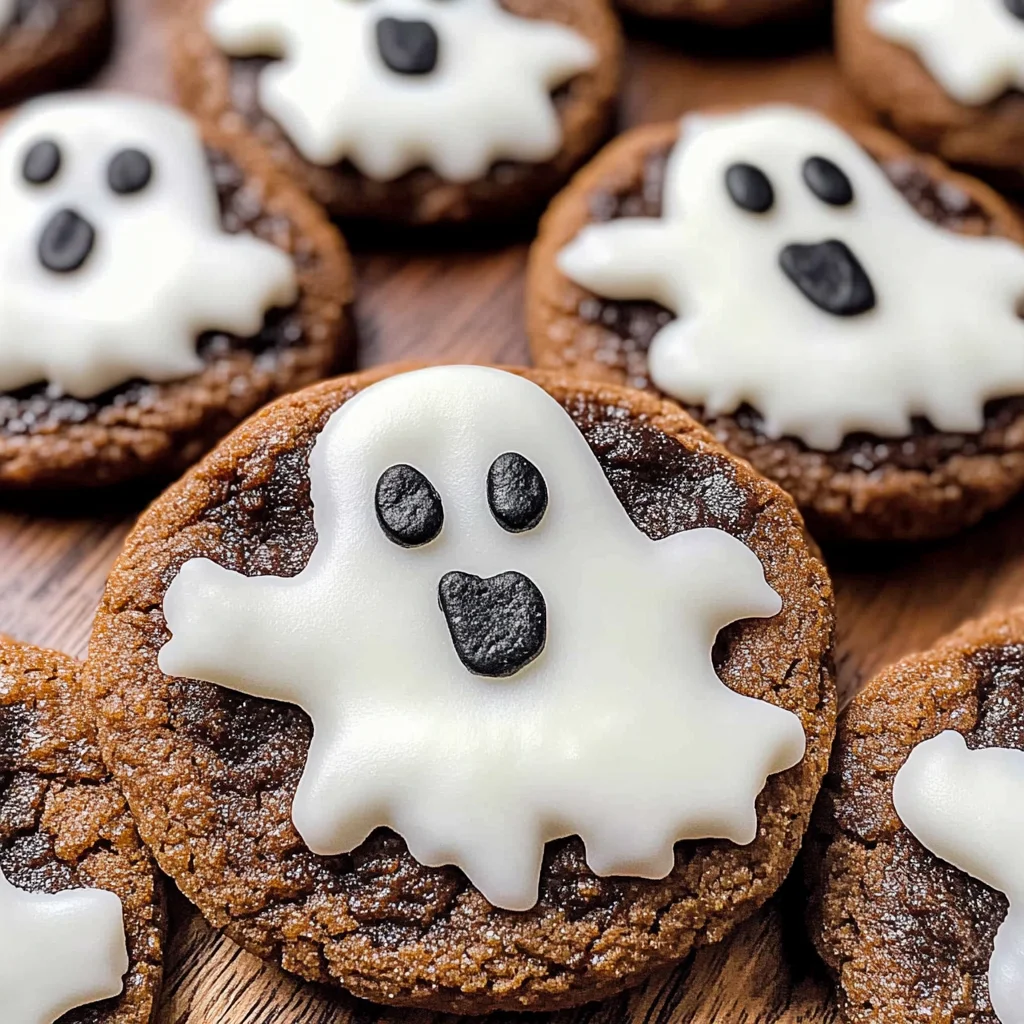
Ghost cookies
Ghost cookies are a fun and festive way to celebrate Halloween! These delicious treats transform ordinary cookies into spooky delights that are perfect for parties, school events, or just a playful afternoon in the kitchen. With their cute ghostly appearance and simple preparation, these ghost cookies will be a hit with kids and adults alike. Plus, they require minimal ingredients and time, making them an ideal choice for last-minute baking.
Why You’ll Love This Recipe
- Quick and Easy: This ghost cookies recipe comes together in just 25 minutes, allowing you to whip up a festive treat without spending hours in the kitchen.
- Fun for All Ages: Decorating these cookies is a delightful activity for kids and adults. Get everyone involved in creating their spooky masterpieces!
- Minimal Ingredients: With only four simple ingredients needed, you can easily find everything at your local grocery store.
- Perfect for Any Occasion: While they’re great for Halloween, these ghost cookies can also be enjoyed at birthday parties or other festive events.
- Cute Presentation: The adorable ghost shapes will impress your guests and add a fun touch to your dessert table.
Tools and Preparation
To make ghost cookies, you don’t need fancy equipment. Just gather some basic tools from your kitchen.
Essential Tools and Equipment
- Mixing bowl
- Baking tray
- Parchment paper
- Spoon or icing spatula
Importance of Each Tool
- Mixing bowl: Essential for combining your icing sugar with water to create a smooth icing for your ghost cookies.
- Baking tray: Provides the surface needed to assemble and decorate your spooky treats.
- Parchment paper: Prevents sticking and makes cleanup easy when baking these delicious cookies.
Ingredients
To make these delightful ghost cookies, you’ll need:
For the Ghost Cookies
- 175g icing sugar
- 1 x 200g pack chocolate chunk cookies
- 9 marshmallows (regular size)
- black writing icing
How to Make Ghost Cookies
Step 1: Prepare Your Workspace
Start by clearing your kitchen counter or table. Lay out all the tools and ingredients so you can work efficiently.
Step 2: Make the Icing
In a mixing bowl, combine the icing sugar with a little water until it reaches a thick but spreadable consistency. Adjust the water as necessary.
Step 3: Decorate the Cookies
Place each chocolate chunk cookie on the baking tray lined with parchment paper. Using a spoon or spatula, spread a layer of icing over each cookie.
Step 4: Add Marshmallow Ghosts
Take one marshmallow, cut it in half if desired, and gently place it on top of the iced cookie to create the ghost’s face.
Step 5: Draw Faces with Icing
Use the black writing icing to draw eyes and a mouth on each marshmallow. Get creative with different expressions!
Step 6: Let Them Set
Allow the icing to dry slightly before serving or storing your ghost cookies. Enjoy these spooky treats at your next Halloween gathering!
How to Serve Ghost cookies
Ghost cookies are not only delicious but also a fun treat for Halloween gatherings. These spooky delights can be served in various ways to elevate your festive celebrations.
Party Platter
- Create a Halloween-themed dessert platter featuring ghost cookies alongside other spooky treats like mini cupcakes and gummy worms.
Trick-or-Treat Bags
- Package individual ghost cookies in clear bags tied with orange or black ribbons for a charming trick-or-treat giveaway.
Halloween Movie Night
- Serve ghost cookies while enjoying classic Halloween movies. They make the perfect sweet snack to enjoy during the spookiest scenes.
School or Office Treats
- Share ghost cookies with classmates or coworkers during Halloween week. They are an easy and fun way to spread holiday cheer.
How to Perfect Ghost cookies
Making ghost cookies is simple, but a few tips can ensure they turn out perfectly every time. Follow these suggestions for the best results.
-
Use fresh ingredients: Ensure your chocolate chunk cookies are fresh for optimal taste and texture.
-
Customize the marshmallows: For added visual appeal, choose colored marshmallows that match your Halloween theme.
-
Practice icing control: If you’re new to using writing icing, practice on parchment paper first to create perfect ghost faces.
-
Allow cooling time: Make sure your cookies cool completely before decorating; this helps the icing set better and prevents melting.
Best Side Dishes for Ghost cookies
Pairing side dishes with ghost cookies can enhance your Halloween festivities. Here are some great options to complement your spooky treats:
-
Pumpkin Soup: This warm and creamy soup brings seasonal flavors that pair well with sweet ghost cookies.
-
Cheesy Eyeball Pasta: Spaghetti topped with mozzarella balls and olive eyeballs makes for a creepy yet tasty dish.
-
Witch’s Brew Punch: A green punch made with lime sherbet and soda adds a refreshing touch to your Halloween party.
-
Mummy Hot Dogs: Wrap hot dogs in crescent dough strips to create mummies, adding both fun and flavor to your menu.
-
Deviled Eggs: Decorate deviled eggs with black olives or food coloring for an eerie twist on this classic appetizer.
-
Spider Web Dip: Layered bean dip decorated with sour cream webs offers both flavor and fright at your gathering.
Common Mistakes to Avoid
When making Ghost cookies, it’s easy to make a few common mistakes. Here are some to watch out for.
- Skipping the Icing Sugar: Forgetting the icing sugar can result in less spooky-looking cookies. Make sure to coat the marshmallows well for that ghostly appearance.
- Overheating the Marshmallows: If you heat the marshmallows too long, they can become too sticky. Heat them just enough to soften for easy placement on the cookies.
- Using the Wrong Cookies: Not all cookies work well for this recipe. Stick with chocolate chunk cookies for the best flavor and texture.
- Inconsistent Cookie Sizes: If your cookies vary in size, they won’t look uniform. Aim to use equally sized pieces for an appealing presentation.
- Neglecting to Chill: Allowing your decorated Ghost cookies to sit can help the icing set properly. Don’t rush this step for better results.
Storage & Reheating Instructions
Refrigerator Storage
- Store your Ghost cookies in an airtight container.
- They will last up to 3 days in the refrigerator.
Freezing Ghost cookies
- Freeze them in an airtight container or freezer bag.
- Ghost cookies can be frozen for up to 2 months.
Reheating Ghost cookies
- Oven: Preheat to 350°F (175°C) and warm for about 5 minutes.
- Microwave: Heat one cookie at a time for about 10-15 seconds, being careful not to overheat.
- Stovetop: Place on a warm skillet just until warmed through, checking often.
Frequently Asked Questions
Here are some frequently asked questions about Ghost cookies.
What are Ghost cookies?
Ghost cookies are fun Halloween treats made from chocolate chunk cookies topped with marshmallows and decorated with black icing to resemble ghosts.
Can I customize my Ghost cookies?
Absolutely! You can use different types of chocolate or even add sprinkles for extra flair. Get creative!
How do I store leftover Ghost cookies?
Store any leftover Ghost cookies in an airtight container either in the refrigerator or freezer as mentioned above.
Are Ghost cookies suitable for kids?
Yes! They are perfect for kids due to their fun appearance and ease of preparation, making them a delightful Halloween activity.
Final Thoughts
Ghost cookies are not only adorable but also incredibly simple to make, making them perfect for Halloween gatherings or cozy family nights. Feel free to customize them with your favorite candies or colors, ensuring they fit your festive needs perfectly!
Ghost Cookies

Ghost cookies are a delightful Halloween treat that combines fun and simplicity in the kitchen. These charming cookies, topped with marshmallows and decorated to resemble spooky ghosts, are perfect for parties, trick-or-treating bags, or cozy family gatherings. With just four ingredients and minimal prep time, you can whip up these ghostly delights in a flash. Kids will love the creative decorating process, making it an excellent activity for all ages. Whether you’re hosting a Halloween bash or looking for a quick festive snack, these easy ghost cookies are sure to impress!
- Prep Time: 10 minutes
- Cook Time: N/A
- Total Time: 0 hours
- Yield: Makes approximately 9 ghost cookies 1x
- Category: Dessert
- Method: Baking
- Cuisine: American
Ingredients
- 175g icing sugar
- 200g pack of chocolate chunk cookies
- 9 regular-sized marshmallows
- Black writing icing
Instructions
- Prepare your workspace by gathering all tools and ingredients.
- In a mixing bowl, combine icing sugar with water until it reaches a thick but spreadable consistency.
- Place each chocolate chunk cookie on a parchment-lined baking tray and spread icing over each one.
- Cut marshmallows if desired and place them on top of the iced cookies to create the ghost's shape.
- Use black writing icing to draw faces on the marshmallows.
- Let the cookies set before serving.
Nutrition
- Serving Size: 1 cookie (approx. 40g)
- Calories: 130
- Sugar: 12g
- Sodium: 30mg
- Fat: 5g
- Saturated Fat: 2g
- Unsaturated Fat: 2g
- Trans Fat: 0g
- Carbohydrates: 20g
- Fiber: 0g
- Protein: 1g
- Cholesterol: 0mg